samedi 27 juillet 2013

Confirm your unsubscription from 'Six Revisions'

Be The First To Comment
To confirm that you no longer wish to receive updates from 'Six Revisions', please click on the following link:

https://blogtrottr.com/unsubscribe/confirm/KSSv7d/35ZZnD


If you weren't expecting to receive this email, then simply ignore it and we'll go away.

vendredi 26 juillet 2013

daily tutorial photoshop for Six Revisions

Be The First To Comment
Six Revisions
 
How to Quickly Get Started with Git
Jul 26th 2013, 10:00, by Jacob Gube

How to Quickly Get Started with Git

A basic understanding of version control has become a necessity for everyone working with code, no matter if you’re a software developer, a web designer, or even a graphics designer who has to work with developers in a team.

Apart from the have-to-know aspect, however, there are also a number of reasons why you should want to use a version control system (VCS).

Why You Want to Use a Version Control System

Version control makes collaboration in a team easier. Without a version control system, everybody on the team is probably working on the same shared set of files. It’s only a matter of time until someone overwrites someone else’s changes.

Also, a VCS takes care of combining changes from different people into one common version. In version control nomenclature, this is called merging. As a result, working on the same files simultaneously becomes safe and easy.

But even when you’re working on your own, a VCS still has plenty of benefits.

For example, version control makes storing and restoring versions of your project a lot easier.

Without a VCS, you’re probably saving versions of your files and folders using your own adventurous naming scheme, resulting in a horrifically unmanageable number of files and folders with file names like website-relaunch-homepage_2013-10-11_v3_JenniferSmith.html.

With a VCS in place, you only have a single project folder on your disk. All other versions and variants are safely stored in your version control system’s database, neatly described, and ready to be restored any time you want them.

Last but not least, one of the best aspects about using a VCS is that it serves as documentation, and also helps promote the act of documentation.

Since each major change is wrapped in a commit (more about this term later), and each commit is described with a message, you can very easily follow along and understand the incremental changes in a project. This becomes even more useful when problems arise and you have to find out where they originated.

Why You Should Use Git

A ton of version control systems are available on the market, each with their own pros and cons.

However, there are many reasons why you should choose Git.

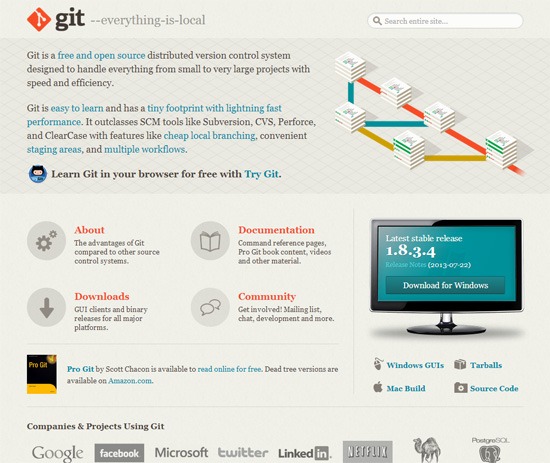
Git, for one, is arguably the most popular open source version control system out there right now.

Git home page screenshot.

As a decentralized version control system, Git offers:

  • Incredible speed
  • The ability to work offline
  • The advantage of having a complete copy (including the project’s history) on your machine

Another big advantage of Git is its superior branching management. Although other version control systems also know the concept of branches, Git was really built around it, and thus it provides a super-fast and easy branching experience. Once understood, making use of this concept can really take code quality to another level.

Other concepts, like the Staging Area or the Stash, also contribute to making Git a very useful part of your coding tool belt.

When choosing any tool, you should also keep another factor in mind: Popularity. A tool without adoption in the market, without a community, is most often badly documented, can’t be integrated with other systems, and is not sure to survive in the long run.

Git has already arrived in the mainstream. With projects like the Linux kernel, Ruby on Rails, jQuery, and many other major open source projects, as well as big companies (such as Google, Facebook, and Twitter) using it, both of Git’s quality and its longevity are proven.

Install Git

Installing Git has become incredibly easy in recent times (lucky you!).

There are one-click installers for both Mac and Windows.

To follow along with this guide, please install Git on your computer first.

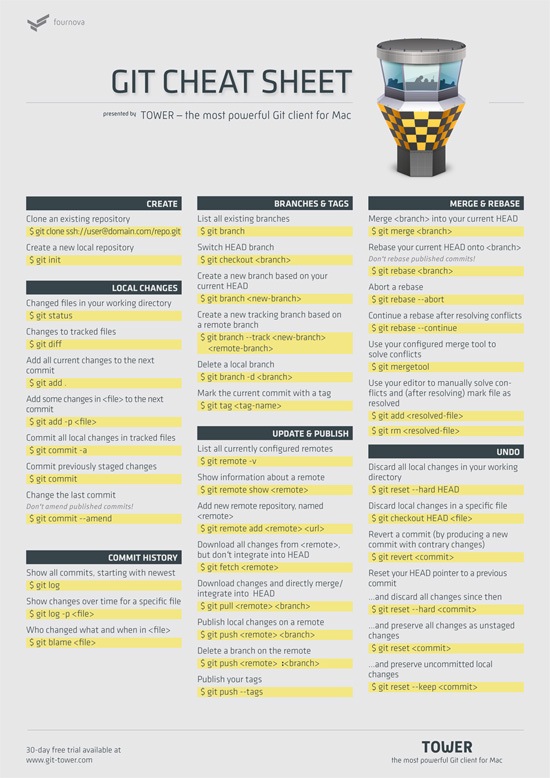
Also, having our free Git cheat sheet handy will be useful before we begin delving into Git.

With the Git cheat sheet, you don’t have to remember all the Git commands by heart, and it will allow you to deviate from this guide and explore Git on your own.

After completing the Git installation, it’s time to fire up your command line.

Two basic configurations should be made before you get started: Your name and your email.

To set your name and email, issue the two following Git commands, but modify them so that you’re using your own name and your own email address:

$ git config --global user.name "Your Name"
$ git config --global user.email "your@email.org" 

Start Using Git with Your First Repository

There are two ways to start working on a project with version control: cloning an existing repository and creating a new repository.

Cloning an Existing Repository

When you’re getting on board of a project that’s already running with a version control system, you were probably provided with a URL to the project’s repository on a remote server.

What’s a repository? A repository is just a fancy term for a project’s set of files and folders.

For example, check out jQuery’s repository on GitHub:

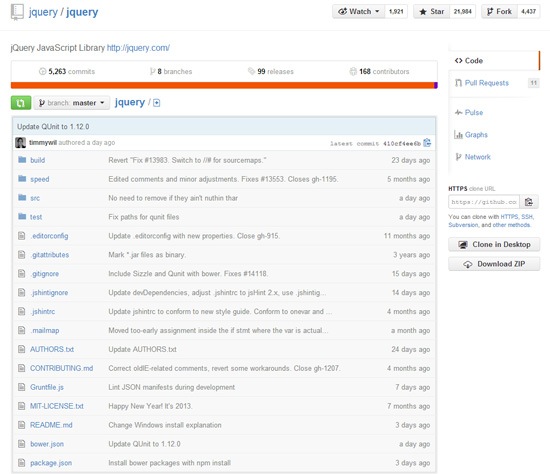
To get a copy of a project’s repository on your local computer, use the git clone command, like this:

$ git clone https://github.com/gittower/git-crash-course.git

The command above will download the respective repository located at https://github.com/gittower/git-crash-course.git to your computer.

Note: If you don’t have a repository, feel free to clone from the above Git command example and fiddle with the test repository that it contains. You can also browse through open source projects on GitHub, find a repository that’s interesting to you, and then clone it to your computer.

Creating a New Repository

The other possibility to getting started with version control is when you already have an existing project that is currently not under version control yet.

Navigate into the project’s root folder with the command line, and then use the git init command to start versioning this project:

$ git init

Verifying the Presence the .git Folder

You might be wondering where Git stores all the data about your repository.

In both scenarios that I talked about — cloning an existing repository or creating a new repository — you should now have a hidden folder inside your project’s root folder. That folder is your local Git repository, and that folder’s name is .git.

You can verify this by issuing the ls Unix command like this:

ls -la

Knowing that this folder exists is more than enough. You should not touch anything inside this magical folder.

Working on Your Files

When working on your project’s files, you’ll have a great deal of peace of mind, and it will help liberate your creative and experimental thinking.

You don’t have to be fearful any longer about making changes to your files: modify, delete, add, copy, rename, or move them using whatever application you prefer (such as your favorite editor, a file browser, etc.).

Git will allow you to undo changes when necessary, and it won’t affect anyone else working on the same file.

Making Commits

It’s only when you feel you’ve reached a noteworthy state that you have to mind version control again.

At this point, when you have reached a good stage in your work, it’s time to wrap up your changes in a commit.

A commit just means submitting the changes you’ve made to your files, to your repository.

Get an Overview of the Changes You’ve Made

My recommendation and a good practice: As the first step to making a commit, give yourself an overview of what you’ve changed.

You can easily see an overview of your changes with the git status command:

$ git status

After issuing a git status command, Git will list all changes since you last committed, grouped into various categories.

Here’s our working example output after issuing the git status command:

Git output example

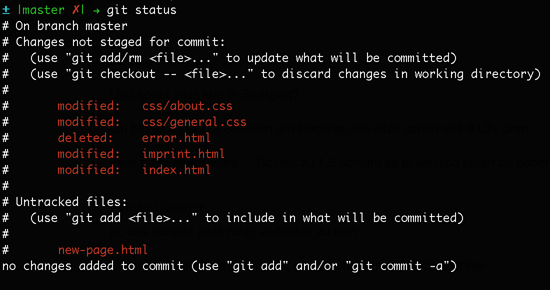
You might be unfamiliar with a couple of terms in the working example output above: 

  • Untracked files: Git calls files untracked when they aren’t yet under version control. In most cases, these are simply the new files you’ve created before committing to your repository.
  • Staged/Unstaged files: Just because a file was modified doesn’t mean it’s automatically included in the next commit. To include changes in a commit, you explicitly need to tell Git to include them. This is a major difference that Git has compared to other version control systems; and a major advantage, at the same time, because it allows you to compose a commit very precisely with only related changes. Changes that were marked for the next commit are called staged, while changes that should simply be left as local modifications are called unstaged.

Preparing to Commit

Now is the time to mark the changes you want to wrap up in the next commit. In Git lingo, this process means you’re staging your changes.

How do you stage your changes?

  • Use the git add command for modified and untracked files.
  • Use the git rm to confirm the deletion of a file.
  • In cases where you want to stage all of your changes you can use the git add -A command.

From our working example above, here’s how you would stage the index.html file (which was modified), the new-page.html file (which is untracked), and the two modified files in the css folder:

$ git add index.html new-page.html css/*

Here’s the command confirming that you’d like to delete the error.html file:

$ git rm error.html

If you look at the output of the git status command from our working example above, you’ll see that, additionally, the imprint.html file was modified. I deliberately didn’t stage it with the git add command, because I want to leave it for a later commit.

Review Before the Commit

Again, I suggest taking a look at what git status tells you before finally making the commit.

Here’s the output of our working example now, after I’ve staged the files I want to commit:

The Changes to be committed paragraph informs you about what you just staged.

Make the Commit

To save this set of changes in a commit, you only have to use the git commit command with a good, descriptive message that tells you and others what the commit is about, right after the -m option, like this:

$ git commit -m "Implement the new login box"

Inspecting the Commit History

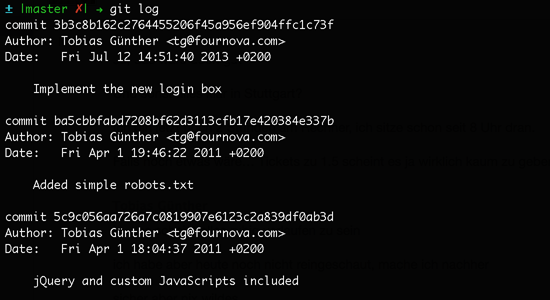
If you want to see what happened in the project so far, you can get an overview with the git log command:

$ git log

This Git command lists all recorded commits in chronological order.

Your Next Steps to Git Mastery

Congratulations! By now, you’ve already grasped the most important concepts of version control and Git.

To get your Git knowledge to the next level, I suggest the following steps.
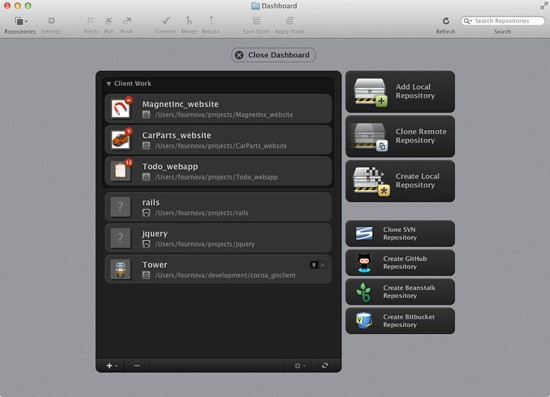
Try a Git GUI

A lot of tasks can be performed easier and more comfortably using a desktop client application, let alone not having to memorize all of the commands and parameters.

Windows users might want to have a look at Tortoise Git, while Mac OS users can give Tower a try, the Git desktop client my team and I have created to make Git easier to use.

Git Learning Resources

In recent years, the amount of documentation, tutorials, and articles on Git has increased a ton.

Read these resources to become better at using Git:

Conclusion

Version control has become an integral part in the modern developer’s workflow.

While version control used to be a chore in the past, systems like Git not only makes version control dead-simple, but also provides a lot of other workflow benefits.

Related Content

About the Author

Tobias Günther is CEO and founder of fournova. In 2010, he set out to make Git easier to use: Together with his team, he develops the Git desktop client, Tower for Mac.

The post How to Quickly Get Started with Git appeared first on Six Revisions.

Delicious Digg Evernote Facebook Google Bookmarks LinkedIn StumbleUpon Tumblr Twitter
You are receiving this email because you subscribed to this feed at blogtrottr.com.

If you no longer wish to receive these emails, you can unsubscribe from this feed, or manage all your subscriptions

Confirm your unsubscription from 'Six Revisions'

Be The First To Comment
To confirm that you no longer wish to receive updates from 'Six Revisions', please click on the following link:

https://blogtrottr.com/unsubscribe/confirm/KSSv7d/37dJDP


If you weren't expecting to receive this email, then simply ignore it and we'll go away.

mercredi 24 juillet 2013

daily tutorial photoshop for Six Revisions

Be The First To Comment
Six Revisions
 
Speed Up Your Web Development Workflow with Grunt
Jul 24th 2013, 10:00, by Jacob Gube

Speed Up Your Web Development Workflow with Grunt

In a series of tutorials, I’m going to help you get started with Grunt, an open source JavaScript task runner that will automate some of your web development tasks.

This nifty JavaScript library will notably speed up and improve your web development processes, and also help you sidestep common human errors.

My intention with this Grunt tutorial series is to get you to experience the same productivity and efficiency improvements I’ve gained through this useful, but little-known open source JavaScript tool.

Here’s the outline of this three-part Grunt tutorial series:

  1. Speed Up Your Web Development Workflow with Grunt: We’ll cover basic information about Grunt; what Grunt is, how to install Grunt, how to use Grunt in your web projects, and a brief overview of gruntplugins.
  2. Create a test project using modern front-end development techniques (will be posted on a later date)
  3. Using Grunt and Jasmine to automate testing and enforce code quality (will be posted on a later date)

Let’s start this tutorial series with some basic information about Grunt and how it can help speed up your web development workflow.

What is Grunt?

When I started my job as a front-end web developer at CDNify (we’re a content delivery network aimed at web developers, startups, and digital agencies) I had absolutely no idea what Grunt was or how it could significantly improve my development workflow.

Months down the road, and I’m now using Grunt every single day. I can’t imagine my front-end web development workflow without it now.

In short, Grunt is an open source JavaScript project that automates repetitive tasks you often have to do as a web developer.

Grunt can automate tasks like minification, unit testing, and preparing your files and website assets for production use. Grunt does this by wrapping these processes up into tasks.

A few more examples of common Grunt tasks are:

  • Optimizing your web images through a service like Smush.it
  • Concatenating JavaScript files into one big file for faster web page load times
  • Running scripts that analyze your code for potential errors (often referred to as linting)
  • Enforcing your coding style guides for uniformity and readability throughout your project’s code base
  • Compiling your CSS from LESS/Sass

Anything that has the potential to be automated can be done with Grunt.

You can configure Grunt to watch certain files for changes, and then build the results on the fly.

Using Grunt in Your Web Development Team

When used in a team environment, Grunt can help every person in that team write code that adheres to the same standards/style guides.

Details such as controlling the indentation of code can now be a strict process, as a whole build will fail if any part throws an error.

For example, when indenting code, you could automatically enforce the use of spaces instead of tabs (or vice versa, depending on your preferences), which will ensure that the whole team has the same configuration. When they push code to the repository, it’s in the expected format.

Used in conjunction with your favorite code-quality tools (for example, JSHint), Grunt will help you catch sloppy code such as missing semicolons, braceless control statements, unused variables, and trailing whitespace. This is excellent for discovering human errors as well as disallowing valid, but badly written, JavaScript.

Prerequisites

To get the most out of Grunt, you should first know (or learn about) the following.

Command-line Interface

In order to use a tool such as Grunt effectively, you will need to have at least a basic understanding of the terminal. You’ll need to be familiar with the command line interface (CLI) for the file system you use.

You should be able to navigate confidently to a folder on your system and run commands within it.

Here are tutorials and resources that will get you started on learning how to use CLIs on your own computer:

However, note that you’ll need to be familiar with the CLI of the SSH client you use to connect to your remote web server if you want to use Grunt on web projects. One popular SSH client for Windows and Linux is PuTTY. (Learn how to use PuTTY by reading its docs).

Don’t be put off; you’ll see that the CLI is very simple once you start using it. It’s also a very powerful tool, and knowing how to use it effectively can speed up your workflow on its own.

Optional: Version Control System

Although not technically required in order to use Grunt, Grunt works best in an environment where version control is important.

Using Grunt for a small static website that is likely to be updated infrequently may be considered overkill. Any web development project that’s larger than that should be version-controlled. And large web development projects are where Grunt becomes critical and extremely useful.

Read this list of Git tutorials for beginners or this introductory guide to Git to help you get started with Git, a popular version control system.

Get Started with Grunt

I’ll run through the general steps of installing Grunt, which is a process that relies on Node.js (an open source development platform for network applications).

Install Node.js

In order to install Grunt, Node.js must first be installed or available in your dev environment (which could your computer) or your web server.

Currently, Node.js version 0.8.0 and up is the supported version.

Download and install Node.js by first going to:

The official Node.js Download Page has various options for you, such as a Windows installer, a Mac OS installer, Linux binaries, and the source code.

If you need help installing Node.js, read the following tutorial:

Installing Node.js allows us to install Grunt using Node.js’s package manager, called npm.

Install Grunt

Next, you need to install Grunt and its dependencies. We will install Grunt using Node.js’s npm.

Learn how to install Grunt with npm by reading this tutorial:

Install Grunt’s Command Line Interface (CLI)

Grunt’s Command Line Interface (CLI) allows you to run Grunt in any directory.

We can install Grunt’s CLI with this npm command:

npm install -g grunt-cli

You may need to prefix the command with sudo on OS X, *nix, BSD, etc., or run your command shell as Adminstrator on Windows to install Grunt’s CLI.

Note that installing the CLI doesn’t install the Grunt task runner itself, as each project may wish to use a different version of Grunt. (In this tutorial, we’ll be using Grunt 0.4x.)

Instead, the CLI acts as a bridge between your Gruntfile (more on this in a bit) and the version of Grunt installed locally to your project.

Using Grunt in a Web Development Project

Now that you have Grunt installed, let’s go over the basics of how to use it in a web development project.

To use Grunt in a web development project, we need two files: package.json and a Gruntfile (e.g. Gruntfile.js).

package.json

package.json is a JSON file. This file should be located in your project’s root directory.

Project information and settings are specified in package.json, such as the project name, version, author, and if it’s a private project or not.

package.json also contains what are known in the Node.js nomenclature as devDependencies. devDependencies are items you need for your project. In this sense, Grunt will be an item listed under devDependencies, along with the Grunt plugins you want to use for the project (I’ll talk about this later).

Here’s an example template for a package.json file:

{  	"name" : "Project Name",  	"version" : "version number",  	"author" : "Your Name",  	"private" : true,

"devDependencies" : { "grunt" : "~0.4.0" } }

By specifying the project’s dependencies in package.json, we can use npm to install them for us automatically simply by running the following command in our project’s directory:

npm install

Running that command will give us an output like this:

  	npm http GET https://registry.npmjs.org/grunt  	npm http 304 https://registry.npmjs.org/grunt  	npm http GET https://registry.npmjs.org/async  	npm http GET https://registry.npmjs.org/dateformat/1.0.2-1.2.3  	npm http GET https://registry.npmjs.org/colors  	npm http GET https://registry.npmjs.org/coffee-script  	npm http GET https://registry.npmjs.org/glob  	npm http GET https://registry.npmjs.org/iconv-lite  	npm http GET https://registry.npmjs.org/findup-sync  	npm http GET https://registry.npmjs.org/lodash  	npm http GET https://registry.npmjs.org/js-yaml  	npm http GET https://registry.npmjs.org/hooker  	npm http GET https://registry.npmjs.org/minimatch  	npm http GET https://registry.npmjs.org/nopt  	npm http GET https://registry.npmjs.org/which  	npm http GET https://registry.npmjs.org/rimraf  	npm http GET https://registry.npmjs.org/underscore.string  	npm http GET https://registry.npmjs.org/eventemitter2  	npm http 304 https://registry.npmjs.org/async  	npm http 304 https://registry.npmjs.org/dateformat/1.0.2-1.2.3  	npm http GET https://registry.npmjs.org/dateformat/-/dateformat-1.0.2-1.2.3.tgz  	npm http 304 https://registry.npmjs.org/glob  	npm http 304 https://registry.npmjs.org/colors  	npm http 304 https://registry.npmjs.org/iconv-lite  	npm http 304 https://registry.npmjs.org/findup-sync  	npm http 304 https://registry.npmjs.org/lodash  	npm http 304 https://registry.npmjs.org/js-yaml  	npm http 304 https://registry.npmjs.org/hooker  	npm http 304 https://registry.npmjs.org/minimatch  	npm http 304 https://registry.npmjs.org/which  	npm http 304 https://registry.npmjs.org/rimraf  	npm http 304 https://registry.npmjs.org/underscore.string  	npm http 200 https://registry.npmjs.org/coffee-script  	npm http 304 https://registry.npmjs.org/eventemitter2  	npm http 200 https://registry.npmjs.org/nopt  	npm http 200 https://registry.npmjs.org/dateformat/-/dateformat-1.0.2-1.2.3.tgz  	npm http GET https://registry.npmjs.org/graceful-fs  	npm http GET https://registry.npmjs.org/abbrev  	npm http GET https://registry.npmjs.org/sigmund  	npm http GET https://registry.npmjs.org/lru-cache  	npm http GET https://registry.npmjs.org/graceful-fs  	npm http GET https://registry.npmjs.org/inherits  	npm http GET https://registry.npmjs.org/argparse  	npm http GET https://registry.npmjs.org/esprima  	npm http 304 https://registry.npmjs.org/graceful-fs  	npm http 304 https://registry.npmjs.org/abbrev  	npm http 304 https://registry.npmjs.org/lru-cache  	npm http 304 https://registry.npmjs.org/graceful-fs  	npm http 304 https://registry.npmjs.org/sigmund  	npm http 304 https://registry.npmjs.org/inherits  	npm http 304 https://registry.npmjs.org/argparse  	npm http 304 https://registry.npmjs.org/esprima  	npm http GET https://registry.npmjs.org/underscore  	npm http 304 https://registry.npmjs.org/underscore  	grunt@0.4.1 node_modules/grunt  	├── which@1.0.5  	├── dateformat@1.0.2-1.2.3  	├── colors@0.6.0-1  	├── hooker@0.2.3  	├── async@0.1.22  	├── eventemitter2@0.4.12  	├── coffee-script@1.3.3  	├── underscore.string@2.2.1  	├── iconv-lite@0.2.11  	├── lodash@0.9.2  	├── findup-sync@0.1.2 (lodash@1.0.1)  	├── rimraf@2.0.3 (graceful-fs@1.1.14)  	├── nopt@1.0.10 (abbrev@1.0.4)  	├── minimatch@0.2.12 (sigmund@1.0.0, lru-cache@2.3.0)  	├── glob@3.1.21 (inherits@1.0.0, graceful-fs@1.2.3)  	└── js-yaml@2.0.5 (esprima@1.0.3, argparse@0.1.15)  

Gruntfile

The Gruntfile is the main configuration file for the project, and specifies what tasks Grunt should run and what files in the project they affect.

Your project’s Gruntfile can be a JavaScript file (Gruntfile.js) or CoffeeScript file (Gruntfile.coffee).

In this tutorial, we’ll be using JavaScript.

At its most basic form, the Gruntfile should contain the following:

module.exports = function(grunt){  	grunt.initConfig({  		pkg: grunt.file.readJSON('package.json')  	});  	  	grunt.registerTask('default', []);  };

initConfig is where the dependency options are specified. Each Grunt plugin is configured using a JSON object (with some exceptions).

Some plugins allow more than one configuration to be loaded. For example, there may be a specific set of experimental JavaScript that uses a different library to jQuery, and so that library must be predefined instead of jQuery in the JSHint configuration. (We will look at this in more detail in the third part of this Grunt tutorial series.)

registerTask can be specified more than once. The default task is run when Grunt is executed in the command line, and so this should contain common setup tasks.

At this point, if you run Grunt successfully, it will generate the following output:

Done, without errors.

Now we have a project skeleton which will become useful once we use some plugins.

Using Grunt Plugins

A key feature of Grunt is the use of Grunt plugins. Grunt plugins are referred to as gruntplugins in the Grunt nomenclature.

gruntplugins are user-contributed modules that will help you automate tasks without having to write your own task scripts.

For example, you can use the grunt-contrib-compress gruntplugin to compress and optimize the file sizes of your project files.

To use the plugin in a project, these are the steps to take:

  1. List it as a devDependency object in package.json
  2. Load it using the loadNpmTasks function in the project’s Gruntfile
  3. Register the task by using the registerTask function in the project’s Gruntfile
  4. Run npm install to install Grunt and the plugin

Here’s the sample source code for using the grunt-contrib-compress gruntplugin in your project.

package.json

{  	"name" : "My Sample Project",  	"version" : "1.0",  	"author" : " Ben Briggs",  	"private" : true,    	"devDependencies" : {  		"grunt" : "~0.4.0",  		"grunt-contrib-compress" : "~0.5.2"  	}  }

Gruntfile

module.exports = function(grunt){  	grunt.initConfig({  		pkg: grunt.file.readJSON('package.json')  	});    	grunt.loadNpmTasks('grunt-contrib-compress');    	grunt.registerTask('default', [compress]);  };

Grunt plugins are actually just npm modules that follow the gruntplugin template. You can find gruntplugins on the npm registry by browsing modules tagged with "gruntplugin" or at the official Grunt Plugins page. There are currently over 300 listed gruntplugins.

Summary

In this tutorial, this is what we covered:

  1. What Grunt is, and how it can help web developers speed up their workflow.
  2. Installation of Node.js
  3. Installation of Grunt
  4. Installation of Grunt’s CLI
  5. General usage of Grunt in web development projects
  6. How to use a gruntplugin

In the next tutorial in this Grunt tutorial series, we will go hands-on and apply what we’ve discussed here by creating a simple project using modern front-end development techniques paired with Grunt.

This is the three-part Grunt tutorial series outline:

  1. Speed Up Your Web Development Workflow with Grunt
  2. Create a test project using modern front-end development techniques (will be posted on a later date)
  3. Using Grunt and Jasmine to automate testing and enforce code quality (will be posted on a later date)

To ensure that you get notified when the next parts of this tutorial series is published, follow @sixrevisions on Twitter and/or Like the Six Revisions Facebook page.

Related Content

About the Author

Ben Briggs is a front-end developer at CDNify, a content delivery network designed for startups and developers. He’s passionate about modular CSS, preprocessors and optimization. Find Ben on Twitter: @ben_eb.

The post Speed Up Your Web Development Workflow with Grunt appeared first on Six Revisions.

Delicious Digg Evernote Facebook Google Bookmarks LinkedIn StumbleUpon Tumblr Twitter
You are receiving this email because you subscribed to this feed at blogtrottr.com.

If you no longer wish to receive these emails, you can unsubscribe from this feed, or manage all your subscriptions

lundi 22 juillet 2013

daily tutorial photoshop for Six Revisions

Be The First To Comment
Six Revisions
 
The Most Powerful Word Known to Mankind
Jul 22nd 2013, 10:00, by Jacob Gube

"Nathan," my boss says to me, "we need to get this feature in before we launch the product."

"Don’t worry, it’s fairly simple and shouldn’t take long," I reply.

The request had been lobbed at me out of nowhere. The request seemed pretty straightforward, and apparently it was mission-critical.

If only I’d realized it was actually a grenade threatening to destroy our product release plans.

You’ve probably been in that same narrative before.

These seemingly small and simple requests can quickly become complex, dangerous, and an absolute nightmare.

As the product manager, I should have — and could have — avoided this nightmare by using the most powerful word known to mankind:

No.

Why I Had to Learn to Say No

It had all started so well, we knew what we had to do and started to burndown the stories in the sprint.

(By the way, we use the Scrum software development method. If a term in this article isn’t familiar, check out this Scrum glossary of terms.)

Further requests came in, which wasn’t unusual, and they were quickly accepted without proper investigation.

Oops. Big mistake.

All of a sudden, the release had become bloated and it became much bigger than we had ever anticipated.

There were early signs of the release going off track, with the sprint burndown lagging, the story points increasing significantly, and an unusually large amount of questions being asked about the new stories.

Worst of all, I had started to look like an ass.

The scope had crept, clarity was absent, and I was losing control of this project.

We were hemorrhaging big time.

The bleeding had to stop.

My mindset switched over.

I had caused this mess. So I was going to fix it.

The only way to fix this was to use that amazingly simple but powerfully potent word.

Here’s how I did it, and how you too can get to No.

Stop the Bleeding

Just say No. Don’t use fluffy, doublespeak language. Just say it.

No.

Deny new requests until you have the time and resources to properly look into them. Also, bear in mind that there will be future releases, so you can responsibly delay some ideas into the next release.

This sounds so easy, but it takes some getting used to. It takes a change in thinking.

For example, as a product manager, I’m often under intense pressure from the CEO or the client or my boss or a decision-maker. Saying No to these folks seems to be a career-limiting move.

No is your strongest tool for stopping the bleeding. It will let you reset and it will get you back in sync.

Flip the Problem

I explained why new requests were being rejected. We were close to the release date, and we just didn’t have enough time.

This, too, sounds quite easy; it was a good and honest reason for being unable to accommodate a request.

Yet it’s easy to forget that non-technical folk see what we do as black magic.

Don’t bother with the technical reasons for why the request is difficult to accommodate. Rather, highlight the consequences of adding extra work, such as a delayed release, increased costs, cranky and pissed-off software engineers, and so forth.

If you’re really pushed, make a point that every decision has its consequences.

"We can do what you asked. It just means [TheOtherFeatureYouAskedFor] has to go. Which is more important?"

The ball’s now in their court.

Appeal to Higher Objectives

If a feature request doesn’t progress you towards your business goals, or if it isn’t inline with your product strategy, why are you going to do it?

These types of scope-augmenting requests are often hastily made and not well-formed. They often shouldn’t be in the product until they’ve been better developed.

(Read more about creating good project scopes.)

Learn to say "No, it doesn’t help us get to our goals and it will have to wait for now."If the entire team is heading towards the same objectives, this will also help you gain broader support from other project members.

You Own the Backlog

One of the best tools for product managers is the sprint backlog. And you need to be all over it if you’re a manager.

If the product backlog is mysteriously growing, you’re in big trouble, and you need to step up, get all totalitarian and dictatorial, and let the offenders know the sprint backlog is your domain.

You must own it, and no one else can add to it regardless of how simple the task seems.

This might require a cultural change in your team, and be prepared for some push back, but you must get it done.

If you can’t control your backlog, you’re fighting a losing battle.

Final Thoughts

Hindsight is a wonderful thing. Watch out for seemingly simple requests that are actually grenades in disguise.

I’m now much more proactive about saying No. And if you too want to sidestep the problems I’ve faced, you must also learn how to use No, the most powerful word know to mankind.

Related Content

About the Author

Nathan Conyngham is a customer advocate focusing on project, product and expectation management. He’s an avid believer that the best results are achieved by focusing on the customer, having clarity of purpose and executing well. Get in touch with Nathan via his personal blog or on Twitter @nathanconyngham.

The post The Most Powerful Word Known to Mankind appeared first on Six Revisions.

Delicious Digg Evernote Facebook Google Bookmarks LinkedIn StumbleUpon Tumblr Twitter
You are receiving this email because you subscribed to this feed at blogtrottr.com.

If you no longer wish to receive these emails, you can unsubscribe from this feed, or manage all your subscriptions
 

© 2011 Photoshop TUTO - Designed by Mukund | ToS | Privacy Policy | Sitemap

About Us | Contact Us | Write For Us